Monday 8 April 2013

The Cheeseburger Birthday Cake

Despite my job as a chef I hold my hands up that I never really baked with my boys when they were small, so it delights me now that my 15 year old is interested in baking cakes for family and friends birthdays. This week he was attending a 40th birthday meal for a lady he works with and found a tutorial on you tube for a cheeseburger cake that he wanted to attempt to make.
For years, when the boys were small, I made numerous novelty cakes for their birthdays but none as easy and yet so effective as this one so I thought I would share some photos with you.

First he made a basic vanilla sponge mix and split the mix between  2 7ins round cake tins and baked them. He also made a chocolate fudge cake in another 7ins cake tin (sandwich tin) .
Making The Sponge
After cooking he allowed the cakes to cool on a wire rack.
Cooling The Sponge
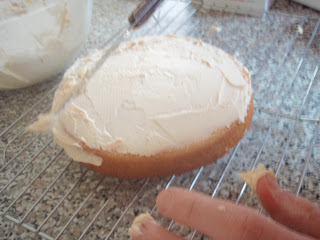
When cooled he made some butter icing. It needed to be a beige colour and, as butter icing usually has a dash of milk in, I suggested he slightly warm that milk first and soak a tea bag in it, to release a brown colour, then add to the icing. It worked! He covered one of the vanilla sponges with the icing to form the base of the cake.
Icing The Base
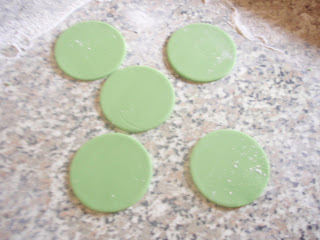
Using a pack of mixed coloured fondant icing that I had bought him he rolled out the green and cut out 13 small circles.
Green fondant Circles
He folded, and roughly crumpled the edges, and then stuck into the icing around the edge of the cake base.

Adding The Lettuce
 Once the circle of lettuce is formed he placed the fudge cake on top, rolled out the yellow icing and cut 4 large triangles and stuck on top of the fudge cake with the butter icing.

Looks just like cheese!
Then he rolled out the red icing and cut out 4 circles for tomatoes and placed on top of the 'cheese'.
Looking tasty with tomatoes and cheese
Time then to put the last of the icing on the 2nd vanilla sponge.
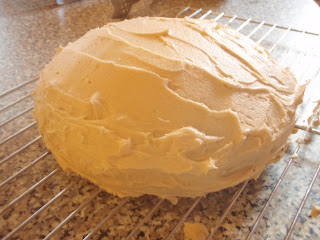
He spread it over the sponge, covering the sides also.
Icing the cake top
He made some tiny white balls of icing and pressed them into the top sponge.
Fondant Sesame Seeds on the Cake
Then, gently together, we transfered the top sponge to sit on top of the fudge cake.
The Completed Cheeseburger Birthday Cake
How easy was that!!!!
Apparently it took him a while to convince everyone at the meal that he had made it himself but all guests thought it was brilliant, especially the birthday girl!
The completed cheeseburger birthday cake.
Many thanks for popping by, now head over with me to Handmade Monday to see what other crafters have been up to this week. Have a great week.

Monday 1 April 2013

Secret Easter Bunny Craft Forum Swap

Well hello. Long time no see!
 A year infact has passed since I was last on the dreamstar diary blog and what a year it has been. Unfortunately my job took over my whole life last year not leaving me with much time, or even inclination, to get my sewing machine out and create. Now, having changed jobs a couple of months ago, I am a much more relaxed and happier person and maybe, just maybe, that little sewing spark will relight in the not too distant future.
 I have, however been creative in other ways, and on my other blog 'Styles Of Cooking' you can see I am doing food challenges and, at present, have almost finished my first challenge of making 15 bread recipes in a month.
 But back to sewing and despite not having done any for a year I still have a daily read of the threads and posts on the craft forum and when sign ups for the secret easter bunny annual gift swap came up I decided it would do me good to sign up again.
I felt quite honoured this year to have Karen 'BeadsByDesign' as my gifts recipient. She annually hosts the easter and christmas forum swaps and puts a lot of time into doing it so I knew my gift needed to be extra special for her.
It's great doing a forum swap as it makes you go on a snooping mission to discover as much about the person as possible. From Karens blog 'Creative and Faithful' I found she was a lover of the sea and beach and of the driftwood and broken pottery that can be found there. So the beach became my main focus for my gift. Having chosen the idea of putting a beach theme on a cushion I first put my ideas down on paper.
First I drew a house. 
Then I added sun, birds, a beach sign, shells and words.
Using my drawings I cut out fabric pieces from all my scraps and sewed them together. I found some lovely little shell design buttons on ebay to sew on too.
I added the words and then, after a quick visit back to Karens blog for colour inspiration, decided on a blue polka dot fabric for the main cushion colour.

.
And here it is!!!!
I am so pleased with the finished product. Infact I may make myself one too.
It's easy to get so carried away designing your own gift that you forget that you actually get to receive a gift too! For me this year my received gift was extra, extra special as it was from a lovely lady that I have admired, and also been slightly in awe of, for the past couple of years. I love her work, her blog, her tutorials, infact everything about her!!
Ros didnt disappoint and she made me these beautiful bunnies 'Pip and Squeak' that I will put somewhere very special and treasure always. You can find more about Ros on her blog rosmademe.
I have decided to enter this post into Handmade Monday over on Handmade harbour blog  for the first time in months. It will be nice to enter back into the world of handmade and see what I have been missing out on for ages| And if you are interested in making bread dont forget to pop by other blop 'Styles Of Cooking' and maybe attempt a few of the recipes.

Wednesday 11 April 2012

Secret Easter Bunny

Well last weekend saw that time of year again when members of the Craft Forum join together to do a Secret Easter Bunny swap.
I had had a long day at work on Sunday so it was lovely to sit down at night and open my secret gift. Or should i say 4 gifts!! Indri, from the crafts forum, had knitted me a cute chick and an egg cosy as well as decorating 2 eggs with some pretty quilled designs.
And as an added treat the chick was hiding a lovely chocolate egg inside.

As for my recipient i was given Jennaodie.
After a little research i found that Jenna was mother to a small boy and created childrens clocks.
She obviously likes cute items so i decided my gift would be one of my teddies.


My full time job has taken over my life somewhat the past 4 months and it was good to get my machine out again and create something new.
It was hard to know what colour to do but i found this very pretty rose printed cotton fabric and thought a teddy would look lovely made out of it.
And so ROSIE was born!


I was really pleased with how she turned out and Jenna put a lovely grateful response on the crafts forum so am hopeful that she was pleased too.


If you want to see any more of Jennas clocks and other items you can visit her Etsy Shop HERE or follow her blog HERE.

Many thanks for stopping by.

Until next time

xxx


Tuesday 1 November 2011

New Job, New Blog.

Been a bit busy in my world lately and i have a new personal challenge, a new job!
It's a job that is going to take me on a journey of personal challenge and development so i have created a new blog where i intend to document everything i learn and achieve.
Interested?
Come visit me at http://chefatskylarkfarmhousecafe.blogspot.com/

Until next time
xxx

Friday 28 October 2011

Halloween Cupcakes

I have a new job!!
I will be revealing more on that front next week but for now one task at my new job was to make some food for halloween.
Now i have been in catering for 25 years but never really done any baking in my workplace so cakes for halloween were quite a challenge.
The internet is a fantastic place for research and boy have i done research!! I have searched for recipes, toppings,designs and everything else i could possibly think of.
Finally i had a bash at trying to create something and below is my first attempt. Because i wasnt sure how long buttercream would last on the shelves of my new shop i used fondant icing to decorate these first cakes. I piped the fondant but it was really hard work and took ages.


This was a batch my son took to school and the kids all loved them.


The thing with fondant is when i packaged the cakes up in the cellophane they went soft and wet looking. So i researched buttercream again and it seems if i put them in airtight packaging they will last on the shop shelves for Halloween weekend.


And so here is todays result and i'm soooo pleased with how they have turned out.


I iced the top of the cakes with buttercream and then moulded fondant icing into ghosts, spiders and pumpkins.


So what are you doing for Halloween?


Until next time


xxx


Sunday 21 August 2011

Surviving A Self Catering Holiday In Yorkshire With Teenagers! PART 3 - FREE DAYS OUT

TESCO CLUBCARD DEALS
Again with a family of 6, days out can be really expensive so, to us, the Tesco Clubcard Deals are a godsend.We have used them for 5 years now.
It works on a points system. Points can be gained via several outlets. We save all our vouchers that we receive throughout the year then exchange them for participating organisations in the area that we are holidaying in.
This year we found 3 such places and had 2 fantastic FREE days out.


Our first day out was at LIGHTWATER VALLEY THEME PARK in Ripon.


A great day out for teenagers. The clubcard vouchers saved us £108! What a bargain!


And what was even better was that the sun also shone!! Take a look at their website for more park details.


Our other FREE day out thanks to TESCO was in the characteristic town of York.


From Maple Cottage it took us about 50 minutes to York. We parked in the Park And Ride. Great value. Free to park then only a bus charge for adults and the kids travelled free.


On arriving in the city center we immediately boarded the CITYSIGHTSEEING bus and handed over our TESCO vouchers. We took the full hour tour so we could establish what we wanted to see in the town. It's a great way to see everything and a ticket can be used for 48hrs and you can hop on and off as you wish.


Without the vouchers a family ticket for the 6 of us would have cost £24.


We "hopped" off of the CITYSIGHTSEEING bus to enter THE YORK DUNGEON .


Again we had ordered our tickets through Tesco before our holiday so the attraction cost nothing, and what a fab attraction it was.
During your visit you will see 11 scary shows with 7 of them led by actors, and sometimes you will be chosen to join in with the show! I was chosen to sit in a torture chair while the torturer demonstrated a device used to wrench out tongues! My tongue is still very much in place after the experience though so do not panic!!


These are just some of the attractions that tesco clubcard offers vouchers for and definately a brilliant idea for a budget holiday. Take a look at the website for more ideas.


Thanks for popping by.


Until next time


xxx


Saturday 20 August 2011

Surviving Self Catering Holiday In Yorkshire with Teenagers! PART 2 - CATERING

So it's your holiday and who wants to be spending their time in the kitchen! As much as we try not to be controlled by food on our holiday it is hard when teenagers get so hungry all the time and you are on a basic budget.
For us, as a family of 6, to eat out at night you are looking at £70-£80 including desserts and drinks and even if we could afford it i would much prefer to have that extra money for days out.
So forward planning is the answer!

1. MAKE A LIST
Choose 6 basic meals that all 6 like.
Ours were: Bolognaise
Boiled Ham
Curry
Sausages
Roast Chicken
Noodles
2. PACK SOME ESSENTIAL EQUIPMENT
Think of what equipment you use at home that your holiday accommodation possibly wont have but will make life easier for you.
I took: 2Large Saucepans
Wok
Slow Cooker
Frying Pan
3. PLAN A SHOPPING LIST
Write a list for all dry foods, breakfast cereals and lunchtime pack up items to buy before you leave so that you dont have to shop as soon as you get on holiday and also so you can shop without children, (my shopping trips are always so much more expensive when i take kids with me!)
4.SHOP THE DAY BEFORE.
I now go shopping the night before at my local tesco and pack my items very neatly in their bags and straight into the car. No hassle and totally organised!!

This year, for me, was so much more relaxed planning my catering in this fashion.
Until next time
xxx